Tech Musings

Thursday, April 13, 2017

PHP-Nuke Community Points System

I've been working on the creation of an online community using an incredibly cool piece of GNU GPL software named PHP-Nuke by Francisco Burzi. My only gripe about this awesome and free product is that documentation for developers is a bit on the thin side.

For example, one of my goals for the online community was to utilize the built-in PHP-Nuke point system. My plan was to add points to a member's profile if and when he or she posts a comment and/or votes on a story, engages in a forum discussion and participates in any other of a variety of interactive activities. This way, active members will earn higher rankings in the community based on increased levels of participation.

Great idea. Problem was, after installing PHP-Nuke I couldn't figure out how to make it work. There is no option (that I am aware of) to manage a community point system from the Administrator console. I searched for information online and was eventually lead to an add-on (NukeCops article 2071) that promised to manage the points system; unfortunately, I couldn't find an active, working link to download what is now, I believe, a defunct utility. To add insult to injury, I could find no intelligible discussion board dialect which shed light on how user points in PHP-Nuke are enabled, assigned and/or utilized. Oh, the madness! This was not going to be as easy as I had assumed!!

After resigning myself to the fact I'd need to dig through PHP-Nuke's source code to answer my questions, I soon discovered points are stored in a MySQL table named nuke_group_points. Values from this table are queried and points are assigned to a member's profile via a function named update_points located in mainfile.php.

There are 21 default records in the nuke_groups_points table. Curiously, all point values are set to zero (0) as part of the standard install of PHP-Nuke 8.0. This is why the points system doesn't work out of the box. It is up to the developer (or database admin) to modify these 21 values as needed. Easier said then done, I'm afraid, as I could find no literature documenting how records correspond to acts of participation (i.e. which record is used to assign points for posting a Forum comment, submitting a Survey vote, etc.)!

Tedious as it was, I uncovered references to all 21 records in the phpNuke application source code except for one-- record #4. I have no idea where this point value is used. If you know, please append it in a comment to this blog entry. In any event, to clarify things I decided to insert additional fields into my points table which would help me identify how a record's point value is used in relation to the overall point system. There are now fields in my points table which identify the path to the corresponding module page and line number where the function call is located for each record, as well as a field which includes a brief explanation as to how the record's value is used to assign points for a particular activity. I figured I'd make this updated table available to the PHP Nuke community in case someone else is out there pounding their noggin trying to deconstruct the obfuscated assignment scheme. Hopefully, this will save somebody, somewhere, some time.

Click here to download a zip file with the SQL instructions that will replace your default phpNuke group points table with my referenced, more detailed version. I submitted this zipped file as a download to the main PHP-Nuke site and will link to it there if it is eventually approved.

Labels: ,

Friday, February 10, 2017

Saving SSH Connection Settings

For the life of me I couldn't remember how to save a customized SSH session today on my local computer. I've done it before, but it's been a while and I wasn't able to figure it out after a quick Google search. So... I guess it makes sense to post these directions so I can refer to them again when I undoutedly suffer brain plaque on this topic in the future.

It's pretty easy to customize the OS X Terminal including changing its background color, text size, font type, etc. However, to execute a SSH command directly upon Terminal's launch one must edit the appropriate *.term file in ~/Library/Application Support/Terminal/ with either the PropertyListEditor application (included as part of Developer Tools) or with a sufficient text editor like BBEdit or even pico.

*.term library files are formatted as XML plists. First, save the session window via Terminal > File > Save As..., then look for the "shell key" at line #194 in the corresponding *.term file and enter the appropriate path to SSH followed by the remote server's authentication URL. For example, to connect via secure shell from my client to my server which hosts site.domain.net on port 2444 , I would enter the following command into the string variable of my Shell key:

<key>Shell</key>
<string>/usr/bin/ssh root@site.domain.net -p2444</string>

It's possible to include the password (e.g. root:password@root@site.domain.net -p2444) in the string, but keep in mind the password won't be encrypted and is "a sitting duck" as clear text on the local machine (i.e. hacker's delight).

Saturday, April 30, 2016

Tracking Changes to the OS X File System

I was troubleshooting a problem today related to the use of parental controls in OS X 10.5 Leopard and form post-processing in Firefox when I made use of some rare (for me) but helpful set of UNIX terminal commands used to detect and view modifications to system files.

To offer context, we learned today that Firefox "bonks out" when parental controls are enabled in Leopard. People logged in under our limited student account were unable to authenticate to various Web sites, post text in blog spaces, etc. using Firefox. Not surprisingly, everything worked just peachy in Safari (isn't that a hoot?). After knocking our heads against the wall we determined the issue is probably related to the way Leopard's parental controls handle access to proxy services, and there is no fix (as of this post) except to use the Safari browser (yuck), manage everything using Workgroup Manager (not practical in our case), or disable Parent Controls altogether. Lovely.

Anyway, this exercise in futility was not a total loss because I re-learned how to search and find system files accessed (i.e. modified or read) during a specific time period.

For example, to see all the files that changed during a process (such as installing an application), create a timestamped file to use as comparison in the Terminal using touch and run the following find command:
$ touch ~/Desktop/Before.txt
do something...
$ sudo find / ~type d -cnewer ~/Desktop/Before.txt > ~/Desktop/After.txt
This creates a file named "After.txt" on the Desktop that lists all changes made to system files since you created the file "Before.txt."

Or, you can use the following command to search for files in your home directory that were modified exactly 2 minutes ago (or any time since):
$ find ~ -mmin -2 \! -type d
Pretty nifty! There is also a command-line program available called logGen which can be used to track changes to OS X system files modified during package installs. This tool comes in handy when creating personal .pkg installations using IceBerg or Apple's PackageMaker developer tool. I've had better luck creating successful package installations with Iceberg than with PackageMaker. Since I'm on the subject, I should mention another essential tool every Mac "techie" should be familiar with named Pacifist, a great little shareware application created by CharleSoft that can be used to peek inside Mac OS X packages, extract individual files and folders, and find missing or altered installation files.

Thursday, April 07, 2016

Show Scroll Position Firefox Extension

I created a Firefox extension this week to display the (X,Y) scroll coordinates of the browser window in the status bar. I'm pretty proud of myself, actually! This article written by Justin Huff was a big help. I'm planning to eventually add it to the Firefox Add-on extension Web site after I test it on multiple platforms and Firefox versions. So far, I've only had a chance to test it on Mac OS X with Firefox 2.0.x.

Yesterday, I was trying to decide where to place the vertical Y scroll position in a javascript scrollTo function and decided to look for a Firefox extension that would show me the window coordinates in real time. Amazingly, I couldn't find one. I was so surprised someone hadn't yet created this easy add on that I decided to create it myself!

In the meantime, feel free to test it out on your platform and let me know if it works for you!! This is still an experimental add-on which means you will need to create an account on the mozilla site to download it.

Show Scroll Position Extension (.xpi).

Tuesday, April 14, 2015

Using Foreign Keys in MySQL

Last week I discovered a neat little feature of MySQL I'd never used before; the ability to use foreign keys as a way to delete (or update) relational records across multiple (i.e. joined) tables. This is called a CASCADE ON DELETE and it has been available as a feature in transactional databases for quite some time. In fact, it has been available in MySQL Server since version 3.23.44. Foreign key constraints are attractive to database designers because they force degrees of referential data integrity.

There were a number things I needed to do to get this to work including changing the engine on my tables from MyISAM to InnoDB, creating indexes and setting up each key relationship. My intent was to implement these changes using phpMyAdmin, but some of the discussions and articles I came across were a bit wanting in this regard and offered little in the way of quick, decipherable information.

Consequently, I decided to create a series of video tutorials demonstrating how I eventually used phpMyAdmin to establish foreign key constraints in my database. Perhaps these little narrated clips will help a fellow "head scratcher" looking to do the same thing with data in his or her MySQL environment. I know they would have saved me time had I come across similar resources as I was doing my own investigation.

On a side note, this is the first time I've used Google video services in this capacity and I'm interested to see how it goes. I decided to use both the built-in video upload feature available in Blogger and Google video (Introduction clip only) to reach a potentially wider audience. I'm not that jazzed about the "watchability" of these videos so I made the higher quality Quicktime movies available for download, too.

Introduction:
The following preface clip introduces the use of foreign keys to CASCADE DELETE related records between parent and child tables.

Download Quicktime version (.mov 2.1 MB)


Step 1:
First, convert all MySQL tables from MyISAM to InnoDB (if needed).

Download Quicktime version (.mov 6.3 MB)


Step 2:
Next, designate indexes on appropriate fields.

Download Quicktime version (.mov 13.4 MB)


Step 3:
Finally, add foreign key relationships between parent and child tables.

Download Quicktime version (.mov 5.8 MB)


Update 5/5/08

MySQL might complain and throw a #1216 or #1452 - Cannot add or update a child row: a foreign key constraint fails SQL error similar to the following when creating foreign key relationships in EXISTING tables which have already been populated with data.

SQL Error: Cannot add or update a child row: a foreign key constraint fails screen shotMySQL error as seen in phpMyAdmin 2.11.5.1 stating there was a foreign key constraint that failed in a child row.

Why? Because orphaned records exist in the child table which relate to a record in the parent table that has already been deleted! Fortunately, I've found some handy SQL queries using LEFT OUTER JOIN here to clean child tables and easily delete unmatched records. As always, don't forget to BACK EVERYTHING UP before attempting these queries!! First, to find "wayward" records with no matching id in a corresponding parent table:
SELECT * FROM `agenda` LEFT OUTER JOIN meetings on
agenda.meeting_id=meetings.meeting_id WHERE
meetings.meeting_id is NULL;
Then, if your query was successful and found the appropriate records:
DELETE agenda.* FROM `agenda` LEFT
OUTER JOIN `meetings` ON agenda.meeting_id =
meetings.meeting_id WHERE meetings.meeting_id IS NULL;

Labels: ,

Friday, February 27, 2015

Retaining Spaces and Quotes in Search Text Boxes

I am all about crafting usable forms on my Web pages. I give a lot of thought to the user experience which is why I was recently bugged over the search environment on my Web sites. You see, I often post back (or is it postback?) to the same page and dynamically return submitted text into the value attribute of the input field after users perform keyword searches. In other words, if a user looking for information about widgets on one of my sites types the word widgets in the search field they are returned a result set AND the word widgets will reappear or repopulate in the search box. This provides my visitors with visual confirmation of the word they just used in their find operation as well as the option to modify the word (or term) or even delete it entirely and start over.

However, until earlier this week I was irritated because the process didn't really work the way I wanted it to. Why? When users included a space or spaces as part of their search text the returned value would truncate or prematurely "cut off" at the empty character and only the initial word of the phrase would be returned back into the search box field. I was very distraught over this premature concatenation! Not a HUGE deal from a functionality standpoint but amateurish and less elegant than I wanted it to be from a usability perspective.

search phrase separated by a space in a keyword text fieldTyping a space or character between words of a phrase in a text box during a search...


truncated search phrase returned to text fieldcaused the second word to be trimmed off or clipped at postback.


Another gripe stemmed from my realization that people never type quotes around phrases when performing searches. No matter how much I promote this technique visitors rarely remember to include double quote marks around word sets inputted into my search boxes.

This is important because I primarily use a MySQL database with full-text indexing and boolean search logic as the backbone repository for all my sites' content. Consequently, search queries work best when phrases are encapsulated by quotation marks which act as modifiers or operators to match indexed rows against particular word sequences.

On a side note, does anyone remember the BG era (Before Google)? I remember we were taught to type quotes around phrases when performing lookups in AltaVista. This technique has been deprecated by Google so maybe this is why people don't bother to surround search phrases with double quotes anymore. Who knows?

Anyhoo, I was in dire need of a prompt that would alert or remind people to consider typing double quotes around their phrases which would in turn aid them in retrieving the most relevant information available in my database tables.
Neither of these issues were particularly difficult to fix. I just needed an hour or so to think about it and do a wee bit of background research. Below you can see how I addressed both fixes on my search page named index.php.

The first fix utilized PHP. I used the string replace (str_replace) to find all instances of spaces in a user's search phrase and replace them with the HTML equivalent of &nbsp;, and to find all instances of double quotes (i.e. quotation marks) and replace them with the HTML equivalent code of &#34;.

quotes and spaces are no longer truncated in the search text box on postbackDouble quotes and spaces are now retained in the text box after the search form has posted.


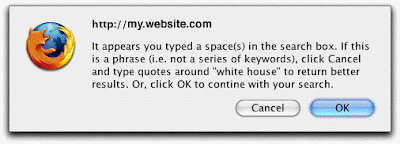
The second fix utilized Javascript validation. A confirmation is now triggered whenever a search phrase contains spaces but is not enclosed in quotation marks. The js alert suggests or recommends typing double quotes around the text in the search box to return a better and more narrow result.

javascript alert notifying user double quotes are missing around search phrase
Users are now greeted with a javascript confirmation if they type a space or spaces between search terms and DO NOT surround them in double quotes.


<?php
$search_term = $HTTP_GET_VARS['search_keywords'];
$count_characters = strlen($search_term);
while($n <= $count_characters)
{
$search_term_tmp = str_replace(" ", "&nbsp;", $search_term);
$search_term_final = str_replace("\"", "&#34;", $search_term_tmp);
$n++;
}

$search_performed = "1"; //used to determine if keyword field has been filled out
if (isset($HTTP_GET_VARS['search_keywords']))
{
$search_performed = (get_magic_quotes_gpc()) ? $HTTP_GET_VARS['search_keywords'] :
addslashes($HTTP_GET_VARS['search_keywords']);
}
?>
----
<html>
<head>
<script language="JavaScript" type="text/JavaScript">
<!--
function check()
{
string = document.search_form.search_keywords.value;

if ((string.indexOf(' ') != -1) && (string.charAt(0)!='"') && (string.indexOf('+') == -1)) {
var answer = confirm('It appears you typed a space(s) in the search box. If this is a phrase (i.e. not a series of keywords), click Cancel and type quotes around \"' + string + '\" to return better results. Or, click OK to contine with your search.');
if(answer == false)
{
document.search_form.search_keywords.focus();
return false;
}
return true;
}
//-->
</script>
</head>

<body>
keyword(s):
<form name="search_form" method="get" action="index.php?search=true" onSubmit="return check();">
&nbsp;<input name="search_keywords" type="text" size="20"
<?php if ($search_performed == "1") {echo ""; } else
if ($search_performed != "") {echo "value=".$search_term_final; } else
if ($search_performed == "") {echo "";} ?>>
<input type="submit" name="Search" value="Search">
</form>
</body>
</html>

Sunday, December 14, 2014

Dreamweaver, FTP and that annoying Cannot Make Connection To Host error

Macromedia Dreamweaver is one of my favorite software tools, but I'll be the first to admit it has its quirks. For example, one day from out-of-the-blue I suddenly lost my ability to use DW to make an ftp connection to my Web server. What the $#%&?!? I hadn't changed anything on my local system; I hadn't applied any OS or application updates; I was still able to connect to my server using other OS X ftp clients like Fetch and Fugo with the exact same authentication credentials, so I knew it couldn't be related to the remote account... darn it. One day the Dreamweaver 8 FTP client was working like a champ and the next day it threw the following error:

Macromedia Dreamweaver error message: An FTP error occurred - cannot make connection to host.Dreamweaver: An FTP error occurred - cannot make connection to host.

Wonderful. I tried to repair this litte annoyance by applying the standard "fix-its" like selecting and unselecting the "Use passive FTP" option, toggling the "Use Secure FTP (SFTP)" on and off in the Site Definition box, double and triple-checking my computer's firewall settings, dumping and recreating Dreamweaver preference file(s), re-creating my site's cache, etc, etc. Nothing made a difference. I did note that the DW error message thrown was a bit different depending on whether or not I selected the SFTP option in the site definition box. I received this alert if I didn't check the little SFTP box:

Macromedia Dreamweaver An FTP error occurred - cannot make connection to host. Access Denied. The file may not exist, or there could be a permissions problem.Dreamweaver Alert! An FTP error occurred - cannot make connection to host. Access Denied. The file may not exist, or there could be a permissions problem.

Why would this message be more verbose than the first, and why would there be a permissions problem? Hmmm... a few Google searches led me to a pretty good Dreamweaver FTP troubleshooting article on Adobe, but none of the suggestions listed in the technote were appropriate. In fact, because of that "Access Denied" error I assumed the problem was related to permissions. Thus, I spent a good deal of time chmodin' and chownin' around inside my file systems... all to no avail. I was ready to give up and resolve myself to using other third party ftp tools but decided to try one last thing and test my connection using Dreamweaver MX 2004, which by dumb luck still resided on my system despite the fact I'd been using Dreamweaver 8 for well over a year.

To my surprise, I was greeted with a completely different message...

Macromedia Dreamweaver: SSH Host Key Change. The host identification has changed for ---. The fingerprint of the host public key is:Dreamweaver: SSH Host Key Change - The host identification has changed for... The fingerprint of the host public key is...


A SSH host key change? Well, well, well... NOW we're getting somewhere! This alert provided me enough information to better understand my Dreamweaver FTP connection problem. Turns out my ISP had migrated my site to a new server and their SSH/SFTP host key had changed. I knew about this but thought I was in the clear because I had updated my known_hosts file in ~/.ssh with the new key. After all, Fetch and Fugo were able to make a secure ftp connection to my server without a problem, right? After some additional digging I discovered in a usenet post that Dreamweaver maintains its own host key information in a ssh_hosts file located under my OS X local user account here:

~/Library/Application Support/Dreamweaver 8/Configuration/ssh_hosts

and dumping this file turned out to be the fix.

What bothered me most about these shenanigans was that the more helpful error message was actually thrown by the OLDER Dreamweaver version— MX 2004!! Why hadn't Dreamweaver 8 provide me with this same SSH Host Key change alert? Doing so would have saved me at least an hour of troubleshooting. Baah! Silly Dreamweaver! :-)

Monday, November 17, 2014

Mac OS X Server 10.3.9 and the "Chroots of my Labor"

If there's one thing I am it is persistent. Some might decree this as a good trait while others might suggest I don't know when to leave "well enough alone." Either way, my incessant affection was evident this past week when I refused to give up on creating a chroot security "jail" on my OS X Server. Admittedly, I probably spent way more time than I should have on this little project. There were more important work tasks at hand. But I can't stand to admit defeat when it comes to UNIX stuff, and I love to troubleshoot and fix problems. And, when I saw my chroot jail work for the first time I admit I was thrilled. I'm now running a more secure environment where I can lock users down to specific directories on my server. I'm finally warden of my own domain! Yay!

To start, if you've read this far you're probably aware that FTP security implementation on OS X Server is ridiculously awful. A user can view any share point on the box regardless of how permissions are configured. When a user SFTPs into his or her home directory, he or she can effectively "climb the tree" and actually view files at the root directory level of the server. This is the stuff of nightmares for any server administrator! I figured there's got to be a better way to do things.

A google search led me to an interesting discussion on macosxhints.com which describes how a server administrator can affectively "jail" users to their home directories using a chroot patch (see Create a chrooted SSH/SFTP server on OS X). This appeared to be exactly "the better way" I was looking for! It was, but it turned out to require an incredible amount of patience and perseverance to "make it work," as Tim Gunn would say.

I had trouble right from the start because the macosxhints discussion took place over two years ago and many of the resource links posted in the thread led to dead ends. A google search provided no leads as to the whereabouts of the referenced Masaki Ogawa's article. I looked for other information related to chroot jails and OS X but came up empty. Perhaps this would be a project for another day. Then I remembered the waybackmachine on archive.org! I've had muted success with the waybackmachine over the years but this time it worked like a charm. I found the instructions!!

My next obstacle stemmed from the fact that the version of OpenSSH Masaki refers to in his write up is no longer available via cvs at anoncvs.opendarwin.org. Apparently OpenDarwin.org went dark in May 2007— ouch. But, after giving it some thought I decided it wouldn't be that big of a deal and pressed forward. I figured I could download and compile another OpenSSH source from http://www.openssh.com and move along my merry way. Well, this line of thinking didn't prove true because I couldn't get any of the chroot patches (http://chrootssh.sourceforge.net/download/) to apply correctly on any of the sources I grabbed at openssh.com. I kept getting weird error messages similar to this:

Hunk #1 succeeded at 64 with fuzz 2 (offset 6 lines)
Hunk #2 FAILED at 1231
Hunk #3 FAILED at 1275
2 out of 3 hunks FAILED -- saving rejects to file session.c.rej

Hunks? Fuzz? What the #$%@? What type of R-rated material was this patch attempting to apply to my system?! I ran ./configure anyway just to see what would happen, followed the instructions to create a testssh connection on port 10022 but received a complaint that told me ssh_exchange_identification: Connection closed by remote host. Nice.

At this point I almost gave up again but discovered through additional research that the OpenSSH build in Ogawa's instructions WAS available at the Apple Darwin source code releases . This reinvigorated my quest and gave me the opportunity to follow his written directions "to the T" instead of poking along in the dark.

His article was written in 2004, so I tracked the appropriate tarball to OpenSSH-39 (Darwin 7.2 OS 10.3.2) which created a Build directory inside of /tmp just like Ogawa described. I was then able to patch this OpenSSH version with osshChroot-3.6.1.diff and compile accordingly.

It's probably worth noting there were a few other issues I needed to overcome before I was able to successfully compile OpenSSH. First, I needed to install the Xcode 1.5 Developer Tools on my box. I had foolishly assumed I was building these sources with a compatible gcc compiler because I had installed the December 2002 Developer Tools on my server a while ago— but this was not the case. Had I read a follow-up post more closely on the original macosxhints article I would have seen that mwnovak cautioned people that OpenSSH WOULD NOT compile correctly unless Xcode version 1.5 (or above?) was installed (read the post). Like a dummy, I originally glossed over this crucial point and found out for myself the hard way through a series of exasperating trial and error. In fact, as I reflect I'm not sure why I didn't give up at this step in the process. I guess it's my aforementioned persistence that made me read the original discussion over and over again until I finally and fully digested mwnovak's important point.

I also had to also deal with a number of OpenSSL library header conflicts and "library not found" errors when building the patched version of OpenSSH. I ran into errors like these:

checking whether OpenSSL's headers match the library... no
configure: error: Your OpenSSL headers do not match your library

I came across this very helpful discussion on the macosx forums which led me to a stepwise article detailing a tip on how to fix an OpenSSL header mismatch error on OS X (granted, it was written for OS 10.1 but the methodology still worked!) by copying the correct openssl header files into the /usr/local/include/openssl directory. My header version, in case you were interested, was 90702f (OpenSSL 0.9.7b 10 Apr 2003) and my library version was 9070cf (OpenSSL 0.9.7l 28 Sep 2006).

So, I needed to hunt down the correct OpenSSL build on the Apple Darwin source code releases pages which contains the OpenSSL 0.9.7l 28 Sep 2006 headers. Turns out these headers can be found in the OpenSSL-46 tarball (Darwin 9.0) listed under 10.5 source code. This confused me because I'm actually running 10.3.9 on my server. What was a 10.5 Darwin source doing on my box? My best guess is that security updates I've applied through 10.3.9 include the most recent Darwin core build of OpenSSL-46. These updates keep my lower level services up-to-date in spite of my outdated OS. Hmmm.....

After applying the chroot patch and getting the OpenSSH to compile correctly each additional step listed in Ogawa's instructions worked like a charm. As noted in follow-up posts in the macosxhints discussion, I needed to change the chroot server path from /usr/local/sbin/sshd-chroot to /usr/sbin/sshd-chroot and copy the etc, usr and bin directories into each user's home directory.

To execute the chroot jail, it is then as a easy as adding a dot into the user's home directory path in Workgroup Manager (WGM) AFTER the directory level where you wish to cap access. You can then go a step further and create a directory as a symbolic link to refer back to the virtual root of the capped directory. For example, say there is a Web site named chetswebsite which lives in Documents inside my server's WebServer folder which is owned by user "Chet." To cap Chet's access inside his site, I create a symlink inside chetswebsite (e.g. tmp -> / ) and add the following path as Chet's home directory in WGM:

/Library/WebServer/Documents/chetswebsite/./tmp

This will cap Chet's access inside chetswebsite to ensure he won't be able to climb any further up the tree. Awesome!!

Wednesday, September 11, 2013

Using double quotes in a Javascript alert outputted through PHP code

An interesting situation present itself today. I wanted to use double quotes (i.e. "") around some text in a form validation javascript alert. Problem was, the javascript was encased in PHP code. The problem quotes are highlighted in blue in the code below...
<? if ($row_count_artifacts['artifact_count'] == '2') { echo "<a href=\"javascript:;\" onClick=\"MM_popupMsg('It appears you still need to add ONE artifact! Click the "Add Artifact" button next to "IV. Artifacts" to enter something you\'d like to share with the GUHSD community.')\"><img src=\"images/alert.gif\" alt=\"Exclamation Point!\" title=\"Incomplete\" align=\"absmiddle\" border=\"0\">"; } ?>

I've always used a backslash (i.e. \) to escape single or double quotes in situations like this, but for some reason my javascript pop-up alert DID NOT work when I escaped the double quotes inside the PHP syntax. The code that didn't worked looked like this:

<? if ($row_count_artifacts['artifact_count'] == '2') { echo "<a href=\"javascript:;\" onClick=\"MM_popupMsg('It appears you still need to add ONE artifact! Click the \"Add Artifact\" button next to \"IV. Artifacts\" to enter something you\'d like to share with the GUHSD community.')\"><img src=\"images/alert.gif\" alt=\"Exclamation Point!\" title=\"Incomplete\" align=\"absmiddle\" border=\"0\">"; } ?>

Escaping with a backslash worked just fine if I used single quotes in the javascript alert text— just not with double quotes. Very strange. By all accounts escaping the double quotes with a backslash should have worked, right? In hindsight, I probably could have made it work had I outputted my HTML in PHP using simple (single) quotes rather than double quotes as this gent recommends, but I didn't feel like it at the time.

So, I ended up getting around this little conundrum by using HTML code for curly or smart quotes (&#8220; for a left curled quote and &#8221; for a right curled quote ) inside the javascript alert like this:

<? if ($row_count_artifacts['artifact_count'] == '2') { echo "<a href=\"javascript:;\" onClick=\"MM_popupMsg('It appears you still need to add ONE artifact! Click the &#8220;Add Artifact&#8221; button next to &#8220;IV. Artifacts&#8221; to enter something you\'d like to share with the GUHSD community.')\"><img src=\"images/alert.gif\" alt=\"Exclamation Point!\" title=\"Incomplete\" align=\"absmiddle\" border=\"0\">"; } ?>

Sunday, August 12, 2007

PNG transparency problems in Internet Explorer

UPDATE 1/11/07! I recently switched out code produced by Dreamweaver's rollover behavior to the rollover code Bob Olsa made available in the source code on this page: http://homepage.ntlworld.com/bobosola/png_mouseover.htm


I'm actually quite proud of myself! I managed to fix a problem that's been bugging me for quite some time. Due to a quirk in the way Internet Explorer 5.5 and 6 on Windows handles PNG alpha transparency (or, more accurately stated, DOESN'T handle it), my navigation buttons on my photography details page were not displaying properly in IE after I applied a javascript rollover effect using a standard Dreamweaver swap image behavior. My swapped png images which include transparent elements did not work and showed as all gray (grey) in the IE 6 browser environment.

After some research I discovered a nice javascript-based fix for IE's PNG transparency problem using Bob Osola's alphaimageloader script, but the script requires that height and width attributes of transparent PNG images be clearly defined on the page or the script won't fix the png transparency problem. Dreamweaver's canned javascript for rollover buttons DOES NOT define the width and height of the target swapped image, so the alpatransparency PNG fix was not working with my transparent buttons. And, to top it off, the generated script from the DW behavior was so incredibly complex that I had no idea where to add these additional height and width attributes.

I posted my problem in the webdeveloper forums asking for guidance. A helpful gent told me where the width and height should be inserted in the bloated Dreamweaver code, and after tinkering with it a bit I finally arrived at the fix as posted in the aforementioned webdeveloper thread here.

Wednesday, August 01, 2007

PHP elseif statements

This has gotten me more than once. It seems like I always get one of these

Parse error: parse error, unexpected T_ELSEIF in mypath/to/the_page.php on line 534

when I craft my else if statements. Undoubtedly, it's because I surround each else if statement within its own set of PHP <? ?> delimiters.

For example, this code will throw the error:

<? $time = date("H:i:s"); ?>
<? if ($time >= "01:00:00" && $time <= "11:59:59") { echo "Good Morning, "; } ?>
<? elseif ($time >= "12:00:00" && $time <= "18:29:59") { echo "Good Afternoon, "; } ?>
<? elseif ($time >= "18:30:00" && $time <= "24:00:00") { echo "Good Evening, "; } ?>
<? else { echo "Hi, "; } ?>
<? echo $row_login['people_firstname']; ?>

whereas the following syntax is correct:

<? $time = date("H:i:s"); ?>
<?
if ($time >= "01:00:00" && $time <= "11:59:59") { echo "Good Morning, "; }
elseif ($time >= "12:00:00" && $time <= "18:29:59") { echo "Good Afternoon, "; }
elseif ($time >= "18:30:00" && $time <= "24:00:00") { echo "Good Evening, "; }
else { echo "Hi, "; }
?>
<? echo $row_login['people_firstname']; ?>

The elseif statement differs from nested if statements that should be contained within the their own curly braces!

Monday, July 16, 2007

Posting Code Snippets on Blogger

Okay, it was high time to bite the bullet and set up a <pre> style so I can more easily post snippets of code on this blog. I arrived at a solution using information from the following helpful places:

HTML Encoder
Use to easily translate < > symbols into format fit for posting.

Dimitri Gielis Blog
Good examples showing use of pre tag in blogger posts including CSS he received from Patrick Wolf.

HTML CSS Trick
A <pre> tag hack to wrap longer lines in this blogger template.

CSS Styled Hyperlinks In DIV Tag

I resolved a hyperlinking style issue yesterday that had been bothering me for the past week or so. I was having a fit trying to figure out how to style hyperlinks that were being dynamically generated from one of my MySQL database tables into a DIV container (i.e. layer) on my web page. I've been defining link styles as a class and adding them to my links inside the href tags (e.g. a href="http://somelink.com" class="linkstyle" ) on a case-by-case basis, but this approach is impractical when links are generated via a queried recordset.

I couldn't for the life of me remember how to correctly assign hyperlink styles or states like hover, visited, etc. to a defined CSS class that also contains things like border and margin definitions. Luckily, my memory was quickly "jogged" after soliciting help in the webmaster forum. I was a little embarrased at how simple of a technique it is to do this-- oh well. At least I got my answer.

The proper way to style all hyperlinks inside a DIV tag is to add ADDITIONAL styling to your CSS class OUTSIDE the curly braces that envelope the defined class in your style sheet. I think the correct definition of these addtional stylings are referred to as psuedo classes. I was pulling my hair out because I was attempting to add the link styling INSIDE the original class definition! Duh!!

Here is how to do it correctly:

.box {

background-color: #22231F;
letter-spacing: normal;

text-align: left;

text-indent: 5px;

vertical-align: middle;

word-spacing: normal;

white-space: normal;

BORDER-TOP: #333333 1px solid;

BORDER-RIGHT: #333333 1px solid;

BORDER-LEFT: #333333 1px solid;

BORDER-BOTTOM: #333333 1px solid;

padding:2.0em;

margin-left:0px;

margin-top:2.5px;
margin-bottom:.5px;

margin-right:.5px;
font-size: 11px;

font-style: italic;

was trying to add the following definitions here!!

}

.box a {
text-decoration: none; color: #FFFFFF; }
.box a:visited {
color: #EEEEEE; }
.box a:hover {
color: blue; text-decoration: underline; }
.box a:active {
color: #CCCCCC; }

I also learned through this experience that there is a difference in CSS between an id (when a style is applied to a unique identifier) and a class (a style that can be applied to many). Pound signs (#) are used in the CSS code when DIVs are styled using the ID Selector method. I was not aware of this ID vs Class distinction!


p#exampleID1 { background-color: white; }

<p id="ExampleID1">This paragraph has an ID name of "exampleID1" and has a white CSS defined background</p>

Monday, June 18, 2007

Apache and mod_rewrite

Oh, for the love of humanity. I can't believe how much time I spent today trying to decipher the esoteric and cryptic regular expression patterns of mod_rewrite. The goal was to redirect visitors coming from a specific domain to a different or separate page from what I'm going to set as the new default. Why? Because I'm preparing to change over the default home page in my domain (mydomain.com) to a FLASH version. BUT, if visitors come from one specific domain (www.thisotherdomain.net) I want them to be redirected to the old PHP page, not the new Flash version.

Using Apache's mod rewrite module I was able to do this but only because I finally found the following helpful forum thread:

http://www.webmasterworld.com/apache/3361785.htm

Here's the example of how to write the .htaccess code for it:

Options +FollowSymlinks
RewriteEngine on
RewriteCond $1 !^old_index.php
RewriteCond %{HTTP_REFERER}^https?://([^.]+\.)*thisotherdomain\.net
RewriteRule ^(.*) http://mydomain.com/old_index.php [R=302,L]

The first rewrite condition is needed because Firefox originally complained about an infinite loop. Interesting, it was much easier to find examples on the Web for this little Apache magic when setting up a redirect based on NOT coming from a specific domain. The example above is nice because it will redirect even if the referring link is from a domain or subdomain on http://www.thisotherdomain.net. Also, it is important to remove the "$" pattern end anchor that I normally place at the end of RewriteCond statements in my .htaccess files.

Friday, June 08, 2007

OS X Default User Template

I normally create a default OS X user template when prepping a master image for deployment. The last few times I've tried this I've run into a snafu or two, so it probably makes sense for me to document it here to jog my memory the next time I do it.

First, it's important to note that I've run into problems using the instructions from Mike Bombich's site here. The last few times I followed these instructions the default user template didn't stick. In fact, I've actually had more luck with the instructions posted by Glenn Rees in this forum post.

1. Tweak your default account including setting dock, clearing cache, recent items, etc. I usually name this account "teacher."

2. Login to the machine as root (I've had problems when I did these steps under a straight admin account as sudo).

3. Create a backup of your current English.lproj template. Don't just issue a mv (move) command to rename it-- create a copy of it using ditto instead.

3. Delete the default home directory files under English.lproj in /System/Library/User\ Template/English.lproj. Don't just delete the entire English.lproj directory!

4. Issue the following commands:

:~root# cd /System/Library/User\ Template/
:~root# sudo ditto -rsrcFork English.lproj/* English.lproj.bak
:~root# sudo rm -rf /System/Library/User\ Template/English.lproj/*
:~root# sudo cp -R /Users/teacher/* /System/Library/User\ Template/English.lproj/
:~root# sudo chown -R root English.lproj
:~root# sudo chgrp -R wheel English.lproj

5. Restart, log in as admin and repair permissions before creating a new account to see if it worked.

I know the sudo commands above are redundant but I just do it as a matter of habit. Slashes and astericks shown in commands above are critical! Also, I've read in some places that permissions on the default user template aren't important but I chown and chgrp on it just to be safe.

Tuesday, April 24, 2007

ALTER TABLE syntax

Once and a while I'll need to INDEX a field (or fields) in one of my MySQL tables that are of the BLOB/TEXT (mediumtext) type. To do this, you need to use the ALTER table query with a length specified. I usually forget the exact syntax to do this so I decided to post it here:

ALTER TABLE `table_name` ADD INDEX (`text_field`(1000));


If you're like me and you forget to add the character length, you'll probably receive a #1170 SQL-query error that reads something like:

#1170 - BLOB/TEXT column 'text_field' used in key specification without a key length


which might occur if you try to alter the table in the future using phpMyAdmin.


After running the alter table command above do a quick repair operation of the table to rebuild the indexes:

mysql> REPAIR TABLE tbl_name QUICK;

Friday, April 13, 2007

PHP 5 Entropy Build

This one has gotten me more than once so I thought it best to log it here for future reference. If using the Entropy (www.entropy.ch) build of PHP 5 for Mac OS X, the php.ini file changes locations. I like to set the display_errors = On if I'm running PHP on my test box (recommend turning to Off in production environment) and sometimes will set register_global=Off from Off to On temporarily to test certain applications. Undoubtedly, I will make these adjustments in the old php.ini file and wonder why they're not working like I expect them to, then after an hour of head scratching remember that entropy uses its own php.ini in the new location. For the record, I've heard you can also manage register globals through .htaccess and virtual site config files, too. It's a security risk to have your register globals on and best to rewrite your code using superglobal array variables instead of taking the easy way out and making the change in the php.ini file. Am I right?!??? ;-)

If your php.ini file was located here /private/etc/php.ini

it switches to this location:

/usr/local/php5/lib/php.ini

Wednesday, March 28, 2007

Backing Up OS 10.3.9 Server Using Rsync +hfsmode

I found some time to better document the process I've been using to mirror data from my OS X Server (which I primarily use for Web services) across the network to a box residing in another physical location. I regularly use Bombich's CCC psync feature to clone local drives, but I prefer to use remote network backups whenever possible. I'm using an "HFS+ aware" version of Rsync to mirror data from my OS X 10.3.x Server (source) over the network to a different box (target) daily through cron jobs.

Step 1:
Originally, I was going to use RsyncX for network backups but decided against it after reading this article on afp548. RsyncX sounds a little buggy to me. Instead, I download and install Andrew Reynhout's patched binary version of rsync which addresses the HFS+ resource fork problem. I'm not too worried about potential lchown problems that could occur when copying symbolic links from one machine to another, mainly because I'm only synching data files and not full directory architectures. Thus, I usually skip the Hoffman patch discussed in the article (plus I'm too dumb and lazy to figure out how to utilize it).

My hope is that there will be no need to go through this "rig-a-ma-roll" and use this patched version after Apple finally gets their act together and includes a workable version of rsync bundled with the OS. In fact, Apple did introduce an "HFS aware" version of rsync in 10.4 Tiger-- but I read somewhere that it's crap. Maybe apple engineers will get on the ball and improve it when Leopard Server rolls out.

I install Reynhout's 2.6.3 version of rsync (named Rsync+hfsmode) on BOTH my source and target machines. To install, download and mount the binary .dmg (linked above) and type the commands listed below into the Terminal window. These commands add the rsync+hfsmode version of rsync into the user account's PATH on both boxes. Truthfully, I'm still a little fuzzy as to which box rsync actually runs on when backups take place (nice, huh?). To address this little technicality, I always install it on both machines to cover my stupidity.

There's no binary package to the enhanced rsync+hfsmode installation. Instead, make a backup of your current rsync program and then overwrite it with the newer, "better" version available inside the disk image.

$sudo mv /usr/bin/rsync /usr/bin/rsync-apple
$sudo cp /Volumes/rsync+hfsmode/rsync-2.6.3+hfsmode-1.2b2 /usr/bin/rsync
$sudo chown root:wheel /usr/bin/rsync
$sudo chmod 755 /usr/bin/rsync


Step 2: Next, prep for SSH transfers between machines using authorized keys as explained in the AFP548 article above. I generate a public/private dsa key pair on the source (OS X Server) under my identified user account with no passphrase. This creates a key fingerprint for the user that I then copy over to my target box. This allows the user account on my OS X server (source) to authenticate to the target box without the need to physically type a password in the Terminal. I couldn't run this network backup as an unattended cron job without this host based authentication. The instructions for doing this are in the aforementioned article on afp548 under "Setting Up SSH."

Here's a screen shot showing the commands for the generation of the key pairs in the terminal window:


Generating public and private dsa key pair in Terminal Window


Step 3: The next step is to implement Bombich's rsync wrapper shell script on my target box. Bombich devotes an entire page about rsync backups on his Web site. His instructions for setting up the public/private ssh keys were confusing to me because of his use of the words server and client. I feel like his instructions are backwards from the way I do it. Anyway, his wrapper envokes a layer of security to ensure the privileges of the user logging in from my OS X Server are limited to the functionalities the rsync script. You add the following line to the beginning of the key present in the authorized_keys files. Use the vi editor rather than pico to make the edit to alleviate line break problems.

command="/private/etc/rsync-wrapper.sh"

Step 4: I searched for and found a decent rsync shell script that was originally created by Art Mulder which includes log rotations and email notifications. I modify it to suit my purposes including adding the appledouble flag to utilize the HFS fix. The source and destination directories targeted for backup are identified as variables $SOURCE and $DEST in the script in the screen shot.

rsync -e ssh --archive --update --delete --verbose --hfs-mode=appledouble $SOURCE $LOGIN:$DEST | tee -a $LOG


Step 5: After I test to make sure everything works I add the shell script to the root account's cron job (type crontab -e in the terminal window) on my source OS X Server box.

Wednesday, March 21, 2007

OS X (10.3.9) Server and CGI with Virtual Hosts

OS X Server's initial set up is designed for webmasters to house all cgi scripts in /Library/WebServer/CGI-Executables/. This is fine, secure and works well unless your server plays host to multiple sites (virtual hosting). In this situation, it might behoove each site to have its own individual cgi bin (i.e. multiple cgi bins on the server) in order to execute scripts unique to each site's own environment. It took me half a morning to figure out how to configure OS X Server to function in this capacity, but I finally prevailed and here is how I did it.

To start, OS X Server includes a ScriptAlias directive /cgi-bin/ "/Library/WebServer/CGI-Executables/" in the main httpd.conf file (/etc/httpd/httpd.conf) which directs anything found in a cgi-bin folder anywhere on the hard drive to automatically redirect to /Library/WebServer/CGI-Executables/. Consequently, I commented out this directive in the main httpd.conf file so each virtual site could have its own unique cgi-bin directory.

#ScriptAlias /cgi-bin/ "/Library/WebServer/CGI-Executables/"

Enabling CGI Execution in OS 10.3 Server Settings Then, in Server Settings I checked the box to enable CGI Execution (under Options) for each virtual site. This added the -ExecCGI option to each site's host configuration file in /etc/httpd/sites/.


<~ Directory "/Library/WebServer/Documents/site_1" ~>
Options All +MultiViews -Indexes -Includes
-ExecCGI
<~ IfModule mod_dav.c ~>
DAV Off
<~ /IfModule ~>
AllowOverride All AuthConfig
<~ /Directory ~>


I thought this would do it, but soon discovered there was one more tiny little step. Between the directory tags inside the site config file, I needed to insert AddHandler cgi-script .cgi. I also added the .pl extension to the end of the line so scripts with a .pl (perl) extension would execute in addition to scripts with a .cgi extension. Basically, adding this line tells Apache that a .cgi or .pl script can be executed anywhere in the site, which could be deemed a security risk without careful consideration.

<~ Directory "/Library/WebServer/Documents/site_1" ~>
Options All +MultiViews -Indexes -Includes -ExecCGI
<~ IfModule mod_dav.c ~>
DAV Off
<~ /IfModule ~>
AllowOverride All AuthConfig
AddHandler cgi-script .cgi .pl
<~ /Directory ~>

Monday, March 12, 2007

Virtual Hosts, DNS, Domain Names and OS X Server

Setting up virtual hosts with DNS on OS X Server was an intimidating prospect. I don't have a sandbox with an outside IP address to test on, so all experimentation related to virtual hosting would need to take place on my production server. Scary. And THIS is why I didn't know beans about this subject... until now!

Over the years I've purchased domain names and tied them into Web sites I've housed with hosting services, but I was not fully versed in the details of how this would work when everything actually resided on my own server. In other words, I was somewhat mystified by DNS and virtual hosting. Also, I've read a multitude of articles on how to set up virtual hosting on Apache, but many seemed overly verbose and difficult to apply to the OS X Server environment and its kludgy (klugy?) GUI.

Apple implemented its own flavor of Apache with OS X Server which has caused me many a headache over the years. Yet, to my chagrin, I don't have easy physical access and control to re-install a different OS on my Web server... if I did you can bet the house I would choose something other than OS X Server to run my Web services!

My other consideration was SOE or search engine optimization. I have a multitude of domain names I want to tie into my site, but I don't want to be penalized by Google or the other big players for promoting redundant content. Thus, I wanted to make sure I set up aliasing correctly so search engines would not find duplicate versions of my site.

Now, there a few different ways to set up virtual hosting on OS 10.3+ server. I originally contemplated trying it with virtual aliasing which was described by kiddailey in this post on oreillynet.com. But he didn't reference the Server Settings GUI which served me pause.

So, I started by posting a general probing question in the apple discussion forum. Part of the problem was that I wasn't exactly sure how to ask for help because I didn't know enough to know what to ask!! This is evident in the discussion thread. I wanted to use the Server Settings GUI to set it up because I was afraid to muck around in the Apache config files for fear of breaking the production server beyond repair.

Based on the feedback I received, I decided to forge ahead and use the GUI to add a second site. My greatest fears were realized as my main site went offline instantly. Nice. I immediately posted a cry for help on the apple board, again. As soon as I hit the submit button I started reading another discussion which helped me finally get my arms around how Apache handles virtual hosting. Conceptually, I was under the impression Apache needed to host each virtual site on its own port number or designated IP address. How could two sites share the same IP and port number? Well, they can because Apache negotiates incoming requests (i.e. traffic) according to what it's instructed to do in the configuration files. This is a pretty good article written in easy-to-understand language that explains the process: http://www.apacheweek.com/features/vhost

Based on what I read in the second discussion, I came to the understanding that ALL sites on OS X Server are set up as virtual hosts. In fact, each site that resides on a box has its own site configuration file located in /etc/httpd/sites. When you create a new site and enable it in Server Settings under Web Services, a new configuration file for that site is generated. It will probably look something like this 0001_214.43.212.41_80_photography.us.com.conf. Any directive featured in the main httpd.conf file can be overruled by directives in each site's individual configuration file. All sites can share the same port number because Apache will listen for an incoming request on a domain name and route that request to the appropriate site to fetch its content. So, when a request comes in on http://photography.us.com/page_1.html, Apache will actually recognize (i.e. read) the domain name (photography.us.com) in the headers sent by the browser and route the request on the server to the appropriate directory according to what it has been told in its config files. I'm beginning to truly appreciate how smart this piece of software really is!!

In theory, both sites should be able to be assigned to the same port, but this wasn't working for me. When I assigned my second site port 8080, both sites finally came online. However, after coming across a domain management service called EditDNS and entering the IP addresses for my server, I was stuck. Where do I input the port number 8080 in the class A record for my domain name? I tried using a AAAA record but was told these were reserved for only IPv6, and I had an IPv4 address (reference this post on nerdie nets). You can't include port numbers in DNS records. Sheee-it.

It turns out that Performance Cache was turned on in Server Settings which was causing all of my problems. After unchecking this box and assigning both sites to port 80, it worked.
unchecking the performance cache in OS X Server Settings for Virtual Hosting
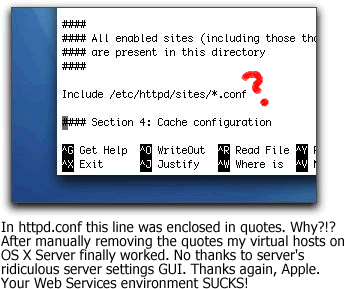
I also needed to remove the quotes around the Include /etc/httpd/sites/*conf in httpd.conf, which, for some ridiculous reason, was not automatically done when I added another site using the server settings GUI. DAMN YOU APPLE! So much of my frustration has stemmed with OS X Server and their damn GUI!!!
Remove the quotes around this Include statement in httpd.conf for virtual hosts to work in OS X Server
The final piece of the puzzle for me was to properly set up domain aliases and 301 redirects. I added all my additional domain names in the Web Server Aliases window under the "Aliases" button separated by hard returns, then added 301 permanent redirects in the .htaccess file. For example, if you want the www version of your domain name to resolve to the non-www version, you add the www version in the server alias window and then enter a 301 redirect in the .htaccess file.
Adding additional domain names into the Sites Aliases window of Server Settings
Entries in my site's .htaccess file:

Options +FollowSymlinks
RewriteEngine on
RewriteCond %{HTTP_HOST} ^www\.photography\.us\.com$
RewriteRule (.*) http://photography.us.com$1 [R=permanent,L]


Options +FollowSymlinks

RewriteEngine on
RewriteCond %{HTTP_HOST} ^www\.san-diego-photography\.org$
RewriteRule (.*) http://photography.us.com$1 [R=permanent,L]

Options +FollowSymlinks
RewriteEngine on
RewriteCond %{HTTP_HOST} ^san-diego-photography\.org$
RewriteRule (.*) http://photography.us.com$1 [R=permanent,L]

Options +FollowSymlinks
RewriteEngine on
RewriteCond %{HTTP_HOST} ^www\.san-diego-photographs\.com$
RewriteRule (.*) http://photography.us.com$1 [R=permanent,L]

Options +FollowSymlinks
RewriteEngine on
RewriteCond %{HTTP_HOST} ^san-diego-photographs\.com$
RewriteRule (.*) http://photography.us.com$1 [R=permanent,L]